If you are looking for a hat heat press for your crafting projects, the Hotronix 360 IQ hat heat press is a great idea to adopt. In this article, we're here to provide you with an overview of the Hotronix 360 IQ hat heat press, the way to use the Hotronix 360 IQ hat heat press, and some tips and tricks for successful printing. Let's dive deeply into the following parts:
An Overview of Hotronix Hat Heat Press
Hotronix 360 IQ Hat Heat Press offers a 360° print area so as to enable users to print the hat without removal during the crafting process. The machine introduces the soft silicone heat platen, which aims to conform seamlessly to both structured and non-structured hats of various shapes and sizes. Utilizing Dual Silicone Plate technology, the Hotronix 360 IQ Hat Heat Press streamlines the application process. The heat emanating from the lower platen facilitates the easy application of dimensional emblems as well as embroidered or leather patches, delivering reliable and high-quality outcomes. What's more, the equipment allows for independent control of the upper and lower platen heat, providing flexibility in temperature adjustments and safeguarding heat-sensitive hats from the risk of scorching.
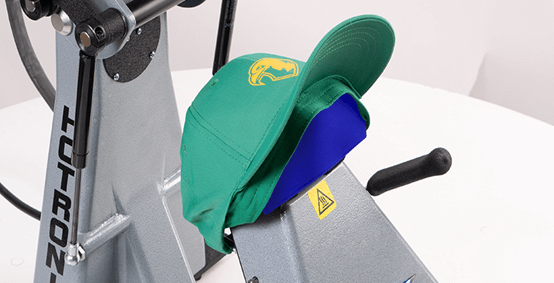
The Hotronix 360 IQ Hat Heat Press is furnished with a digital display, providing the capability to set and monitor time, temperature, and pressure. This feature ensures precise and consistent results with every press. The incorporation of IQ technology further enhances the Hotronix 360 IQ Hat Heat Press, offering cloud-based tracking of machine operation and allowing for valuable insights into your production processes, ultimately improving efficiency. And the Hotronix 360 IQ Hat Heat Press proudly stands as a product of the USA, reflecting its commitment to exceptional quality, durability, and craftsmanship.
Meanwhile, related specifications about the Hotronix 360 IQ Hat Heat Press should be kept in mind prior to crafting:
Dimensions (open): 18" x 12" x 32"
Dimensions (closed): 18" x 12" x 20"
Actual Weight: 44 lbs
Shipping Weight: 50 lbs
Temperature Range: 100–430 degrees F
Power: 10 amps; MUST have designated circuit breaker
Electrical: 120V or 240V; see Overview for full electrical requirements
Heat Printing Area: It is recommended to maintain an ideal maximum height of 2.25 inches, with an absolute maximum of 2.5 inches. Additionally, the recommended width is 5.5 inches, with an absolute maximum of 5.75 inches.

In addition to Hotronix 360 IQ Hat Heat Press, Hotronix boasts the same series product, Auto Cap. Featuring a diverse selection of interchangeable platen sizes, the Auto Cap press empowers you to press a variety of hat styles, encompassing low-profile, unstructured, and varying crown sizes.
Step-by-step Guide to Use Hotronix 360 IQ Hat Heat Press
In preparation for heat application, it is essential to configure the target settings for the chosen transfer material when using the Hotronix 360 IQ Hat Heat Press. You can either select a preset or manually enter the desired values for temperature, time, and pressure. Ensuring accurate calibration of these parameters is paramount to achieving optimal results in the heat transfer process.
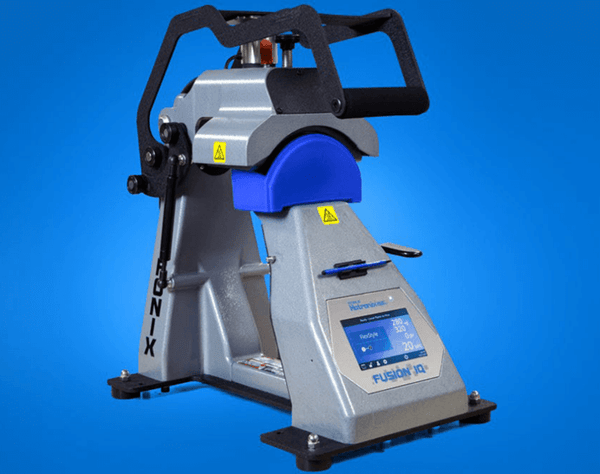
It should be noted that pressure should be set manually through a series of systematic steps. Begin by positioning a cap on the lower heater, then lower the cap hold-down lever so as to secure it in place. The next step is to activate the Target Temp option in System Settings to prevent the electromagnet from locking down. Subsequently, pull the lift handle down and carefully monitor the pressure reading. Fine-tune the pressure by turning the pressure adjustment knob, thus ensuring meticulous control in the heat application procedure.
The home screen of the Hotronix 360 IQ Hat Heat Press features a visual pressure readout that becomes visible when the handle is secured in the print position. During this process, a numerical representation of pressure, ranging from 0 to 9, is displayed.
Upon reaching the desired temperature, position the cap and design with precision, ensuring meticulous alignment. Enable the cap in place by lowering the cap hold-down lever, providing a stable foundation for the heat transfer process. Then, initiate the heat application by pulling the lift handle down. Upon completion, the heat platen will be raised into the UP position. Your unique hat is completed with the steps mentioned above.

Transitioning seamlessly from structured to unstructured, trucker, or bucket hats, the molded lower platen facilitates the effortless printing of unique placements that may be challenging with alternative decorating methods. Whether employing traditional heat transfers or dimensional emblems, the combined heat from both upper and lower platens affords you the versatility to adorn hats with a diverse range of decoration methods.
Tips for Successful Printing with Hotronix Hat Heat Press
The Hotronix 360 IQ Hat Heat Press highlights among its key features a comprehensive 360° print area, a universal one-size-fits-all platen facilitating seamless transitions across different cap sizes, a molded platen designed to minimize creasing and scorching, and the added benefit of independent control.
When handling the Hotronix 360 IQ Hat Heat Press, you should grasp it by the sides of the bill and load it from the side of the platen. Ensure proper alignment by matching the seam of the bill with the lip on the lower platen, allowing access to the full print area.
For a smoother application, extend the sweatband when possible. Cover the logo with the provided pad, adjusting its thickness to match that of the material. It is advisable to remove the hat from the Hotronix 360 IQ Hat Heat Press before peeling the backing, allowing the adhesive to cool and set effectively. To guarantee optimal adhesion, you are asked to refrain from picking or pulling at the emblem or patch for a duration of 24 hours. This careful adherence to the outlined procedures will contribute to professional and enduring results.
Conclusion
Should you find yourself grappling with constrained choices, time-intensive platen adjustments, creases, scorch marks, and erratic outcomes, rest assured that you are not alone in facing these challenges. The Hotronix 360 IQ Hat Heat Press is an ideal choice for you to enjoy the journey in the crafting sector in that the machine certainly enhances the user experience.


















































![[Starter Kit] Auto Heat Press Machine 15" x 15" 110V + Starter Kit Bundle](http://www.htvront.com/cdn/shop/files/20240425-170634_385x.jpg?v=1714036345)
![[Premium Bundle] Auto Heat Press Machine 15" x 15" 110V + 20 rolls HTV Bundle 12“x3ft + Mini 2 Heat Press Machine + Random Sublimation & HTV Bundle ≥ $180](http://www.htvront.com/cdn/shop/files/1UK_4_22c12b1b-12dd-4105-ac25-93e2faae6a8c_385x.jpg?v=1713863580)
