


Learning how to use Cricut Design Space is essential if you're just starting out with a Cricut machine. The thing is that this software has lots of complex functions that can confuse a green hand. Thankfully, we have done your homework by listing all the steps to start designing using Design Space like a seasoned pro. We'll also answer some common questions about this Cricut software. Continue reading to learn!
Part 1: Learn about the area of Canvas
So, what is Cricut Design Space? This is the first question you must answer before exploring the Canvas area. When making Cricut projects, there is much physical work like loading mats, cutting designs, weeding, etc. But before that, you'll need to do the "magic" using Cricut Design Space. This is Cricut's proprietary software for designing projects, setting up a new machine, and updating Cricut's services.
Cricut Design Space has the following four main sections:
- Green Canvas: This is the center workspace for working on your designs.
- Yellow Top Area: this is the taskbar of Design Space for editing and arranging elements
- Red Left Area: This panel lets you insert images, fonts, templates, etc.
- Blue Right Area: The layers panel for accessing Group, Ungroup, Flatten, and other tools.
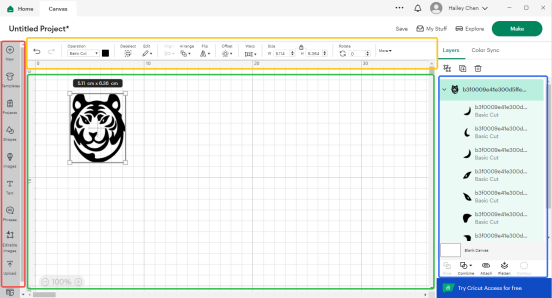
That said, Cricut Design Space's Canvas area is where all the action happens before cutting your projects. This is where you'll retouch and organize your designs before sending them to the Cricut cutting machine. The Canvas area allows you to upload and customize your local designs and fonts, as well as access the program's inbuilt 70,000+ image templates.
Part 2: Tutorial on How to Use Cricut Design Space
So, without further ado, let's learn how to use Cricut Design Space for sublimation. Remember that this powerful software is necessary before setting up and using your Cricut machine. Follow these detailed steps to create and cut designs for any Cricut project:
Step 1: Create your favorite SVG.
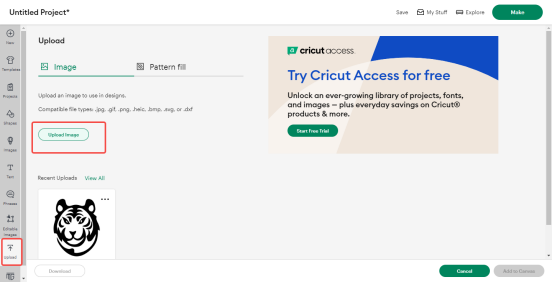
When you are ready to start designing projects on this software, head to the left pane, where you'll get the following options:
- Upload: This button is at the bottom of the left pane. It allows you to upload and cut SVG files on Cricut. If you don't have any local designs to upload, head to https://www.loklikworkshop.com/to download thousands of free SVG designs for any project.
- New: Click this button to create a new Cricut project from scratch or replace an existing project with a new one. When you click it, a blank Canvas will load up where you can upload an image and start editing.
- Templates: Tap it to open the "Templates" window and scroll through numerous image templates. You can filter the templates by different categories or use the search function to find a specific template from the thousands of available options.
- Projects: If you don't have time to make a Cricut project from scratch, Design Space comes with ready-to-cut projects for Cricut Access members or purchases. To access these designs, tap the "Projects" tab to filter the projects by categories or search for a specific keyword or name.
- Shapes: Cricut Design Space comes with various shapes for any project. Tap the "Shapes" tab, then choose any of the free basic shapes. You can also click "Search for more" to find additional single-layer shapes.
- Text: You'll often need to work with texts in your project. By clicking the "Text" panel, you can add new texts to the Canvas and enter the Edit mode to customize the texts accordingly.
- Phrases: Click this button to find some cute and engaging quotes for your Cricut project. Remember that this is a new feature, so you must update the software to access it.
- Monogram: This is another new Design Space feature that allows you to generate eye-catching designs using your initials.
Step 2: Editing your SVG SVG.

There are so many programs that can help you edit your SVG files and proceed to cut them on a Cricut machine. But why would you need third-party software when everything is available on Cricut Design Space? This software lets you edit your design, make animations, create 3D images, and more. All you need is some basic image editing skills to achieve that.
So, to edit designs on Design Space, head to the Edit taskbar, where you'll find a collection of features for retouching your image. For example, you can undo and redo actions or cut, draw, and score layers with the "Linetype" feature. You can also cut, copy, and paste designs onto the Canvas.
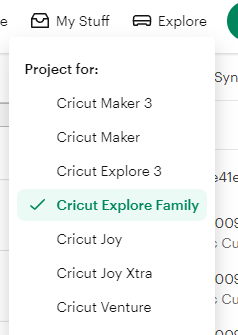
But before editing, remember to choose your connected machine because each Cricut machine has varying editing options and operations.
Step 3: Cutting SVG images.
In this step, we will head to the Layers Panel, which represents all the designs and elements in the Canvas area. You'll find varying layers that comprise the entire project in this section. For example, if you're designing a gift card with a "Happy Birthday" message and the card itself, these features will be displayed in the Layers area.
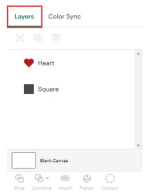
Meanwhile, in the Layers area, you can group, ungroup, duplicate, and delete layers of a project. You can also slice designs, combine shapes, and flatten designs when using the "Print Then Cut" tool. There are also options to attach, contour, and perform color sync.
Note: If you're unsure about a design, click the "eye" icon to hide it instead of deleting it. You'll see a cross mark on the eye after hiding a design successfully.
Step 3: Send the project to the cutting machine.
You're now no longer a beginner and should be ready to cut your design by tapping the green "Make It" button in the top-right corner. But before cutting, ensure you hide anything you don't need to cut and attach the elements. Attaching might be necessary because some cutting components may fail to maintain the same layout on the cutting mat.
After clicking the "Make It" button, you'll need to enter the following cutting specifications:
- Material load type: You can cut with or without a mat.
- Material size: Select the size material you want to use when cutting the design.
- Mirror: This option lets you flip the design horizontally, which may be necessary, especially when cutting infusible ink and iron-on vinyl.

Note: You may need to cut your design if it's made of more than one color. This means you'll cut one color at a time.
Part 3: FAQs
1. What devices are compatible with Cricut Device Space?
Cricut Design Space is a cross-platform image editing program compatible with mobile phones and desktops. You can install Design Space on Windows, macOS, iOS (iPhone and iPad), and Android. But beware of some limitations when using the mobile app, especially the Android version. For instance, the Android app doesn't have the Print Then Cut feature, and both apps don't have some tools, such as the "curved text" feature.
2. How much does Cricut Design Space cost?
Cricut Design Space costs nothing to download and install on your desktop or mobile phone. That means you can install the software, set up your Cricut machine, and run it without making any payments. But remember that the images and templates on Design Space will cost you money. Although you can purchase the whole set of images, you can also buy one image at a time, depending on your needs.
3. How can I install Cricut Design Space?
Downloading and installing Design Space is quick and easy. Android and iOS users can install this app free from the App Store or Play Store. On the other hand, you can install Design Space on Windows/Mac by opening https://design.cricut.com/#/ on your browser and then check the T&Cs box. After that, click "Download" to install Design Space on your computer.
Final Words
Enough with the "how to use Design Space for Cricut" tutorial! Now it's time for you to dust off your Cricut machine and create a cool project using Design Space. Although using this program may seem daunting at first, consistency is critical. You'll create Cricut projects in hours once you get the hang of it. And don't forget to share your Cricut projects and designs with us. Have fun!


![[Starter Kit] Auto Heat Press Machine 15" x 15" 110V + Starter Kit Bundle](http://www.htvront.com/cdn/shop/files/20240425-170634_385x.jpg?v=1714036345)
![[Premium Bundle] Auto Heat Press Machine 15" x 15" 110V + 20 rolls HTV Bundle 12“x3ft + Mini 2 Heat Press Machine + Random Sublimation & HTV Bundle ≥ $180](http://www.htvront.com/cdn/shop/files/1UK_4_22c12b1b-12dd-4105-ac25-93e2faae6a8c_385x.jpg?v=1713863580)


